How to Apply for the Digital Nomad Visa in Colombia: A Step-by-Step Guide (2024)
What is the Digital Nomad Visa for Colombia?
The Digital Nomad Visa allows remote workers or online entrepreneurs to live in Colombia for up to two years. This visa is ideal for digital professionals who wish to stay longer than the standard tourist visa permits, which is 6 months per calendar year — meaning it resets every January, not from your first date of entry. It also means you have to leave before the year ends and re-enter in January for it to reset. You cannot stay in the country continuously for more than 180 days.
Most countries get a tourist permit for 3 months, which is extendable to 3 more months. Unfortunately for some citizens like Canadians, they will have to pay to enter as a tourist when they arrive to Colombia. The extension is free for some countries and others for a small fee of about 110.000 COP or ~25 USD.
To extend your tourist permit, click HERE to read on how to do that.
For those who enjoy living in beautiful Colombia and would like to stay longer than the standard tourist permit, the Digital Nomad Visa is the way to go! It also gives you peace of mind when you have to exit and re-enter the country in between trips.
Let’s see if you can apply for the Colombian Digital Nomad Visa and follow the steps below:

⚡️ QUICK TIPS BEFORE WE GET STARTED:
1. Give yourself two months before your tourist permit expires to apply for the Colombian Digital Nomad Visa. It takes an average of 30 days to get an answer but they could ask for more documents and cause delay.
2. Acquire ALL your documents, even if they are not officially a requirement from the beginning, specifically the Criminal Background Check, before starting the application. Every time they request for new documents, they will only give you 10 days to submit this. Failure to comply would mean restarting the process from the beginning and paying the application fee again.
3. Scan your documents with an app like CamScanner* instead of just taking photos with your camera to ensure legibility.
4. Make sure all your documents are in PDF format and are less than 1 MB in size per file. Use online PDF compressors to help you (they are for free).
5. Label each document as they are, in Spanish. Check example below:
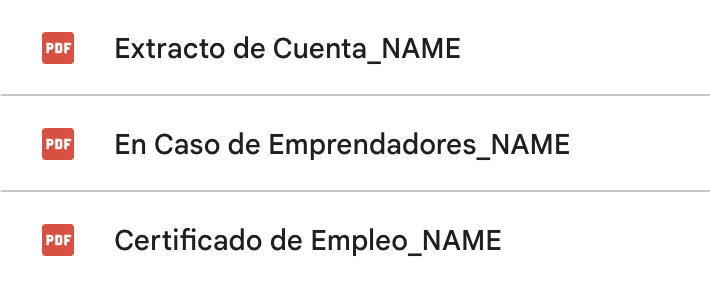
6. When writing your Certificate of Employment, make sure to specify your income, start date of employment, and most importantly stating that you work for that company REMOTELY.
*We are not associated with CamScanner nor is this a paid post
Step 1: Verify Your Eligibility ✅
To apply for the Colombian Digital Nomad Visa, make sure you meet the following conditions:
- Remote Employment: You work remotely for a company based outside of Colombia.
- Self Employment: You run your own business and is registered abroad.
- Minimum Income: You earn at least $750 USD/month (the higher the income, the better chances).
- Health Insurance: You have health insurance valid for the duration of your stay in Colombia.
If you meet these criteria, you’re eligible to proceed with the application.
🤑 Visa Application Fees and Costs
When applying for the Colombian Digital Nomad Visa, you’ll need to account for several fees:
- Application Fee: 216,000 COP (approx. $54 USD)
- Visa Issuance Fee (once approved): 708,000 COP (approx. $177 USD)
- Cédula de Extranjería (Foreigner ID card): 250,000 COP (approx. $63 USD)
These fees are paid at different stages, and using the exchange rate of 4,000 COP/USD, the total cost will be approximately $294 USD.
Make sure to have these funds ready when starting the application process!
Step 2: Gather the Required Documents 📑
Before starting the visa application process, make sure to collect the following mandatory documents:
1. PASSPORT: Ensure your passport has at least 6 months of validity left and a few blank pages. Attach your Criminal Background Check in this document. This is an unofficial requirement and doesn’t hold a spot in the application form so this is your best document to attach it to.
2. PASSPORT PAGE WITH LATEST ENTRY STAMP: Take a photo of the page on your passport of the last time you entered Colombia.
3. PROOF OF INCOME: You’ll need bank statements or pay stubs from the last 3 months showing you meet the income requirement of at least $750 USD per month (we would strongly recommend 6 months just in case but there is a 35 page limit for all of your documents uploaded, just as a heads up so you can organize your documents better).💡 PRO TIP: For your bank statement, highlight by encircling the salaries / income from your employer so they can easily track the income.
4. HEALTH INSURANCE: Obtain international health insurance that covers your time in Colombia. Some local insurers also offer plans tailored to digital nomads. You can use Genki as an option where you can pay month to month and cancel any time but for those of you who truly want to take advantage of the local healthcare, Sura is a great option for this. Contact us to connect you with a trusted agent.
5. CERTIFICATE OF EMPLOYMENT OR PROOF OF BUSINESS:
🧑🏽💻 If employed: A letter from your company explaining your job, confirming your remote status, and detailing your salary.
👩🏽💼 If self-employed: Provide business registration documents and proof of company activity.
6. RECENT PASSPORT-SIZED PHOTO: Follow the official photo size guidelines (usually 3×4 cm).
7. CRIMINAL BACKGROUND CHECK: Now, this isn’t an official requirement but in order to avoid wasting time, money and your sanity, get this sorted before even applying.
Check with your country on the time to process these things as they vary. Some countries take 2 weeks, some others take 6 weeks.
And we’re not done. We cannot submit the document as is. The document needs to be apostilled in your country and then later translated by an official Colombian translation company.
STEP 1: Acquire document from your country
STEP 2: Get it locally apostilled
STEP 3: Get it translated by a certified / accredited Colombian translation company
STEP 4: Attach this document to your passport bio page
8. COMPLETED VISA APPLICATION FORM: This can be filled out on the Migración Colombia website (explained in step 3).
🚨 Make sure all your documents are in PDF format and are less than 1 MB in size per file. Use online PDF compressors to help you (they are for free).
📸 Scan your documents with an app instead of just taking photos with your camera to ensure legibility.
🖨️ Do you need to have the original, physical copy of it? While in our experience we did not have to submit it, it would be best to have it anyway in case they ask for it to be mailed. Just in case!

Step 3: Submit Your Application Online 👽
Once you have all the necessary documents, you can begin the online application process:
1. Go to the Migración Colombia website or simply click HERE.
2. Fill out the visa application form and upload all the required documents, ensuring that everything is clear and accurate (see detailed help below for uploading your documents).
3. Pay the visa fee, which is approximately 215.000 COP or ~50 USD. You will be prompted to complete this step through the online portal.
4. Submit the application and wait for confirmation.
🚨 Important Note: Processing time typically takes around 30 days, so plan accordingly. Do not risk applying with less than 30 days left on your permit. We highly encourage a two month grace period to avoid stress!
Online, it will ask you to upload 8 documents and every option must have a document. You might wonder what to upload for a section that doesn’t apply to you or what the hell they’re asking for because it’s not very straightforward. We feel your pain.
Don’t worry. We gotchu.
This is what it would look like:
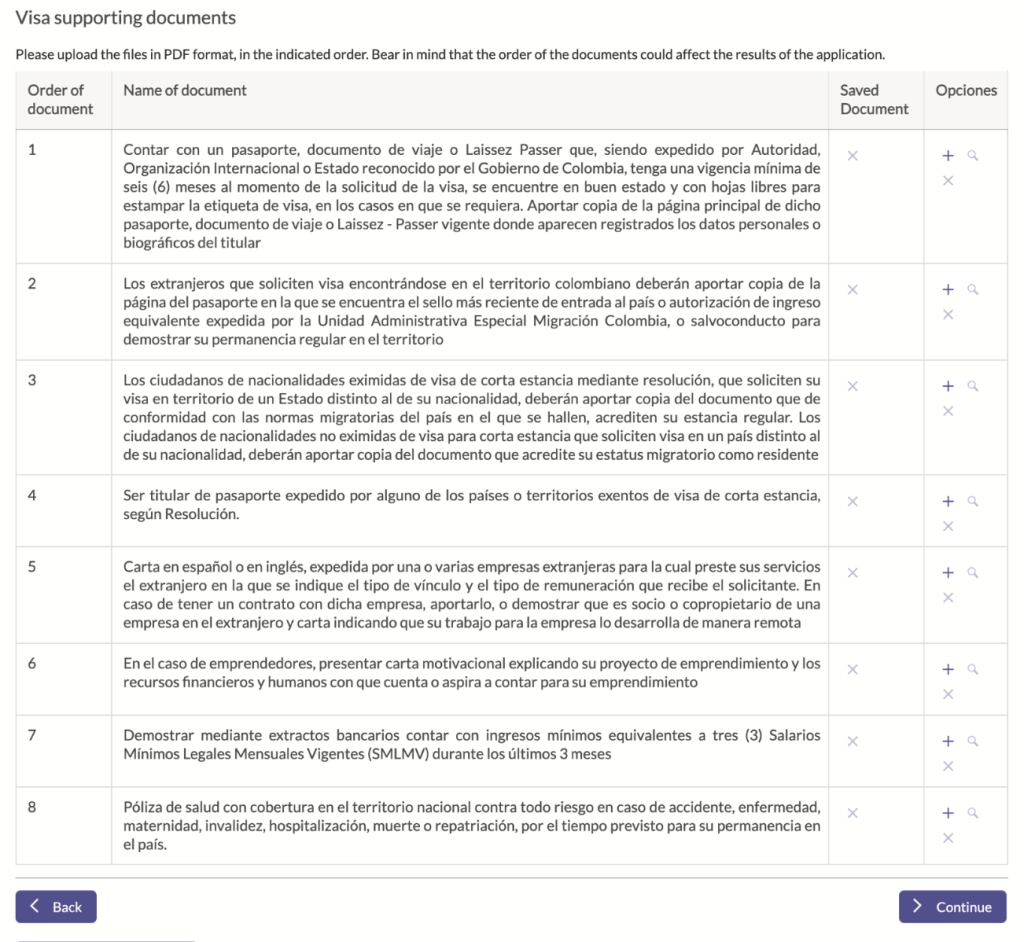
🚀 Here is a rundown of what you should upload for each section in the order written above:
1. Passport bio page + Criminal background check
2. Passport page of the most recent entry stamp to Colombia
3. Proof of legal stay in the country – depending on your situation but if you are on a tourist permit, submit the online proof that you extended your tourist permit in Colombia.
4. Passport bio page + Criminal background check
5. Proof of employment (if this doesn’t apply to you, upload a blank page with the words “no aplica”, see below)
6. Proof of business (if this doesn’t apply to you, upload a blank page with the words “no aplica”, see below)
7. Bank statements / Payment stubs
8. Insurance policy
Step 4: Visa Approval Process 🛩️
Once your application is submitted:
- You’ll receive an email confirming receipt of your application.
- If additional documentation is needed, you’ll be notified, so keep an eye on your inbox.
- Visa approval usually takes about 30 business days. After approval, you’ll receive your electronic visa, which you can either print or store digitally.
FAQs 👀
1. How long can I stay with the visa?
The digital nomad visa allows for up to two years of residence in Colombia. How long you’ll get approved for is under the complete discretion of Migración.
2. Can I apply for permanent residency later?
While the Digital Nomad Visa does not directly lead to permanent residency, time spent in Colombia on this visa could contribute to residency requirements if you decide to switch to a different visa type, but this isn’t guaranteed. Best speak to a lawyer for this. The digital nomad visa for Colombia is new and can change overnight so no guarantees there!
3. Do I need a lawyer to do all this?
No, you don’t. But if you really are busy and have no headspace for this ANDDDD have the budget between 350 – 500 USD for processing, then by all means do it. Whatever makes your life easier. You will, however, still need to get all the documents yourself. The lawyer won’t be able to process that for you, especially not your Criminal Background Check.


